GitHub Pages is a really easy and free way to host React applications. This post is a tutorial for people who want to deploy react apps on github pages automatically on every successful push.
React apps can easily be built with npm run build command. But first, there need to be some changes to host the app on GitHub pages.
1- Install GitHub Pages
Run the following command in project directory:
npm install --save gh-pages
2- Edit Homepage in package.json
Change the homepage section in package.json. It should be in the following convention:
{
    "homepage": "https://<username>.github.io/<your_repository_name>"
}
3- Add Deploy Scripts
In package.json, add these scripts:
"scripts": {
    "predeploy": "npm run build",
    "deploy": "gh-pages -d build"
}
4- Deploy it!
Run the npm run deploy command in the project directory. This will automatically run the predeploy script. So the application will be built before deploying it to the GitHub pages.
If you see the published status on the terminal screen, you can see your react application on GitHub pages. Check out the link you provided in package.json as the homepage.

5- Automated Deploys with Travis
So we have built and deployed the app to the github pages. We want to automatize it using continuous integration.
Sign in to Travis CI with your GitHub account and connect your repository to CI. Travis will guide you through doing this.
Initially, your repo’s build status is unknown. Travis will start builds every time after you push anything to your repository.
Create .travis.yml in the repo’s root directory. This file helps Travis CI understand how to run builds of your projects. (If you don’t have any idea of .travis.yml, check here first: https://docs.travis-ci.com/user/tutorial/)
.travis.yml file looks something like below:
sudo: false
language: node_js
node_js:
  - stable
cache:
  bundle: true
  directories:
    - node_modules
script:
  - npm test
  - npm run build
after_success:
  - git config --global user.name "USERNAME"
  - git config --global user.email "[email protected]"
  - git remote rm origin
  - git remote add origin https://USERNAME:${GITHUB_TOKEN}@github.com/USERNAME/REPO-NAME.git
  - npm run deploy
Change the capitalized fields with your own GitHub account’s information. If you want to use GitHub commit e-mail address, check out here to get yours: https://help.github.com/en/articles/about-commit-email-addresses
Get your GitHub token to authorize Travis CI to push your repo. (You can follow these steps: https://help.github.com/en/articles/creating-a-personal-access-token-for-the-command-line)
Travis only needs permissions of repo scope.
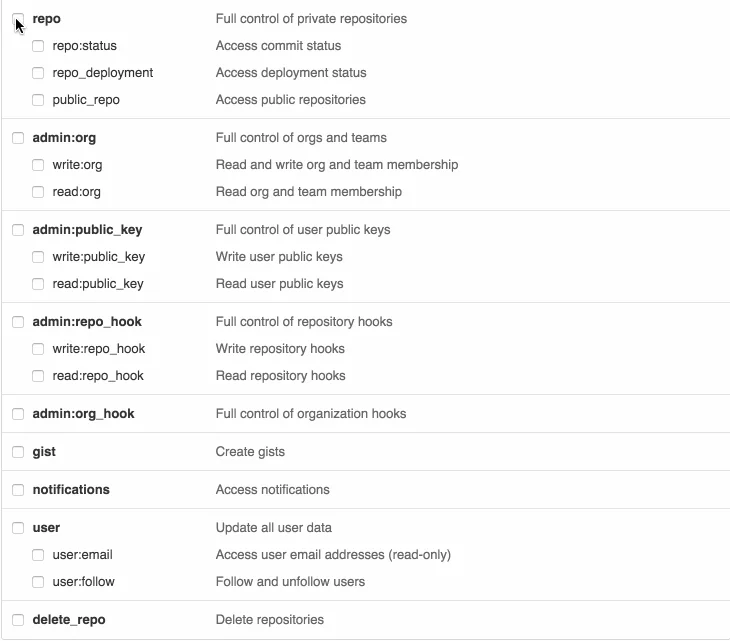
GitHub personal access token scope selection
After getting the repo token, create an environment variable in Travis CI and put your token there.

Travis Environment Variables
6- Push changes to the repo
So just push the changes to the repository and watch how Travis publishes your web page to the GitHub pages.
7- Result
Now your react app must automatically be published to GitHub pages by Travis CI on every successful push to the repo.
If you want to follow a real reference, check out my instant-username-search app on GitHub which I use Travis CI to automatically deploy the app.